
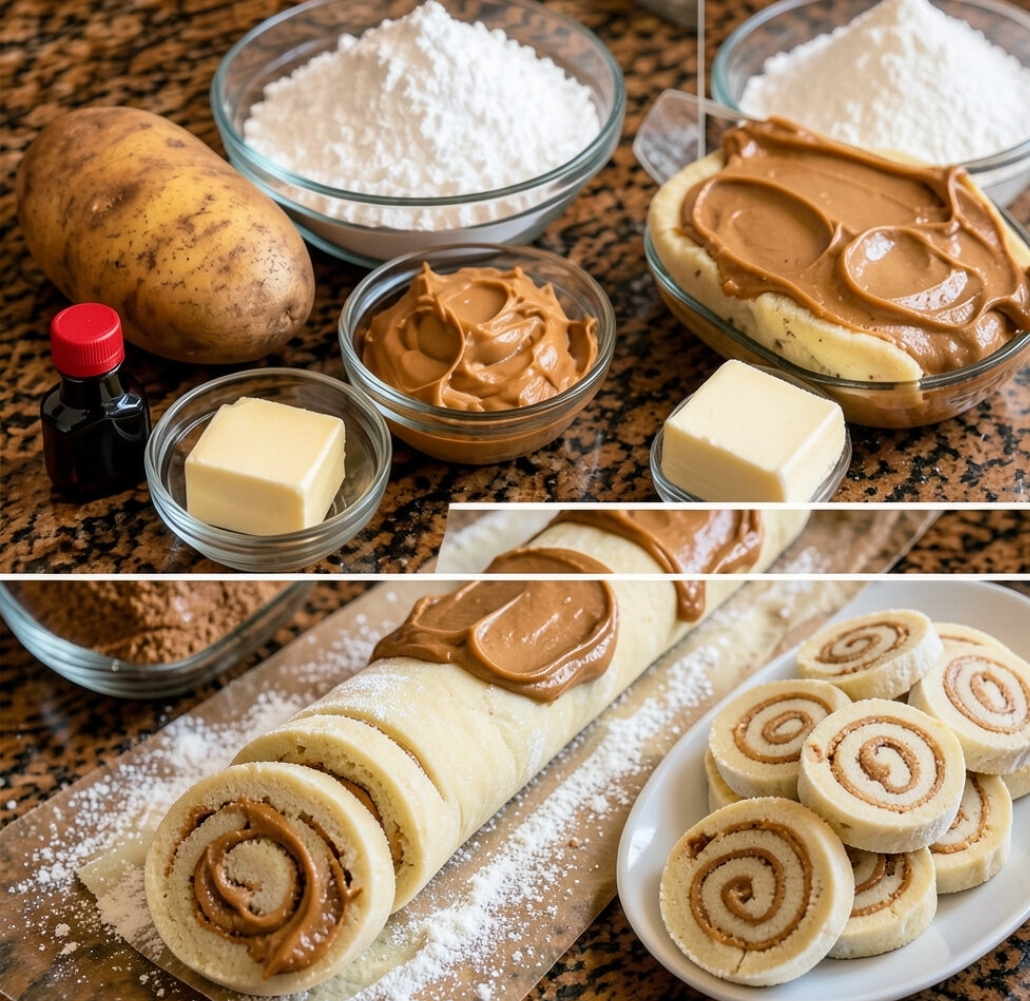
Why You’ll Love These Potato Peanut Butter Cookies
Step back in time and savor a truly unique treat with these Depression-Era Potato Peanut Butter Cookies. If the idea of potatoes in cookies sounds a bit unusual, you’re not alone! Many might initially be skeptical, but trust us, these cookies are surprisingly delicious and incredibly satisfying. Born out of necessity during tougher times, this recipe brilliantly uses humble ingredients to create something truly special.
You’ll love these potato cookies for their incredibly tender texture, a secret gift from the mashed potato, and the comforting, familiar taste of a sweet peanut butter filling. They offer a delightful contrast of textures and flavors, making them a fantastic conversation starter and a sweet reminder of culinary ingenuity. Perfect for baking enthusiasts looking for something different, or anyone who appreciates a simple, homemade dessert, these potato peanut butter cookies are a must-try. Plus, they’re relatively easy to make, making them a great option for bakers of all skill levels.
A Glimpse into History with Every Bite
Recipes like these Potato Peanut Butter Cookies emerged from an era where resourcefulness in the kitchen was paramount. During the Great Depression, families often had to make do with what they had, and potatoes were a staple, affordable ingredient. This recipe is a testament to the creativity and resilience of home cooks who found ways to create comforting and delicious food even when resources were scarce. By making these cookies, you’re not just baking; you’re experiencing a piece of history and honoring the spirit of making the most of every ingredient.
Ingredients for Potato Peanut Butter Cookies
Here’s what you’ll need to create these historical and delicious potato peanut butter cookies:
- For the Cookie Dough:
- 1 large russet potato (about 1.5 cups mashed)
- 1/2 cup unsalted butter, softened
- 1 cup granulated sugar
- 1 large egg
- 1 teaspoon vanilla extract
- 2 1/2 cups all-purpose flour
- 1 teaspoon baking powder
- 1/2 teaspoon salt
- For the Peanut Butter Filling:
- 1 cup creamy peanut butter
- 1/2 cup powdered sugar (confectioners’ sugar)
- 2 tablespoons unsalted butter, softened
- 1-2 tablespoons milk (as needed for consistency)
Ingredient Notes
- Potato: A russet potato is ideal due to its starchy nature, which mashes up light and fluffy. Make sure it’s fully cooked and mashed very smoothly, with no lumps, for the best cookie texture.
- Butter: Using softened butter for both the dough and the filling ensures a smooth, well-combined mixture. If your butter isn’t soft, you can gently microwave it for a few seconds.
- Peanut Butter: Creamy peanut butter works best for the filling as it spreads easily and creates a uniform layer. If you only have natural peanut butter, stir it well before using to ensure it’s not too oily or too dry.
- Powdered Sugar: This is crucial for the filling’s texture and sweetness. It dissolves easily and contributes to a smooth, spreadable consistency.
- Vanilla Extract: Don’t skip the vanilla! It adds a lovely depth of flavor to the cookie dough, complementing the peanut butter beautifully.
How to Make Potato Peanut Butter Cookies
- Prepare the Potato: Peel and cut the potato into chunks. Boil until very tender, then drain thoroughly. Mash until completely smooth, ensuring no lumps remain. Let it cool completely. You’ll need about 1.5 cups of mashed potato.
- Cream Wet Ingredients: In a large mixing bowl, cream together the softened butter and granulated sugar until light and fluffy. Beat in the egg and vanilla extract until well combined.
- Add Potato: Stir the cooled mashed potato into the wet ingredients until fully incorporated.
- Combine Dry Ingredients: In a separate bowl, whisk together the all-purpose flour, baking powder, and salt.
- Form the Dough: Gradually add the dry ingredients to the wet ingredients, mixing until a soft, pliable dough forms. Do not overmix. Cover the dough and chill for at least 30 minutes to make it easier to handle.
- Prepare the Filling: While the dough chills, combine the creamy peanut butter, powdered sugar, and softened butter in a medium bowl. Mix until smooth. Add milk one tablespoon at a time until the mixture is spreadable but not too runny.
- Roll Out the Dough: Divide the chilled cookie dough in half. On a lightly floured surface (or dusted with powdered sugar, as shown), roll out one half of the dough into a rectangle, approximately 1/4 inch thick.
- Spread Filling: Evenly spread half of the peanut butter filling over the rolled-out dough, leaving a small border around the edges.
- Roll and Chill: Starting from one long side, carefully roll the dough into a tight log. Repeat with the second half of the dough and filling. Wrap each log tightly in plastic wrap and chill in the refrigerator for at least 1-2 hours, or until firm enough to slice easily.
- Preheat Oven & Slice: Preheat your oven to 375°F (190°C). Line baking sheets with parchment paper. Unwrap the chilled dough logs and slice them into 1/4-inch thick rounds.
- Bake Cookies: Place the cookie slices about 1 inch apart on the prepared baking sheets. Bake for 10-12 minutes, or until the edges are lightly golden.
- Cool and Serve: Let the cookies cool on the baking sheets for a few minutes before transferring them to a wire rack to cool completely.
Helpful Baking Tips
- Smooth Mashed Potato is Key: Any lumps in your mashed potato will affect the final texture of your cookies. Use a potato ricer or mash thoroughly for the smoothest result.
- Don’t Overwork the Dough: Overmixing can lead to tough cookies. Mix just until the ingredients are combined.
- Chilling is Essential: Chilling the dough makes it much easier to roll out and prevents it from becoming too sticky. It also helps the cookies maintain their shape during baking, ensuring those beautiful spirals.
- Even Spreading: When spreading the peanut butter filling, try to get an even layer to ensure consistent flavor in every bite. A small offset spatula works wonders for this.
- Sharp Knife for Slicing: Use a sharp knife to slice the chilled logs to get clean, neat cookie rounds. If the dough starts to soften, pop it back in the fridge for a few minutes.
Ingredient Substitutions
- Sweet Potato: While traditional, you could experiment with mashed sweet potato for a slightly different flavor profile and color.
- Nut Butter Alternatives: If you have a peanut allergy or prefer other nut butters, almond butter or cashew butter could be used in the filling. Just ensure they are creamy and not too runny.
- Gluten-Free Flour: A 1:1 gluten-free baking flour blend can often be substituted for all-purpose flour. Ensure the blend contains xanthan gum for best results.
- Dairy-Free: Use a plant-based butter alternative and plant-based milk to make this recipe dairy-free.
Variations
- Chocolate Swirl: Add a layer of melted chocolate or a chocolate spread over the peanut butter filling before rolling for a chocolate-peanut butter delight.
- Spiced Dough: Incorporate a pinch of cinnamon or nutmeg into the cookie dough for a warm, spiced flavor.
- Mini Cookies: Roll the dough into a thinner log and slice smaller rounds for bite-sized treats perfect for parties.
Serving Suggestions
These Potato Peanut Butter Cookies are wonderful on their own, but here are a few ideas to elevate your serving experience:
- Serve them with a glass of cold milk or a cup of hot coffee or tea for a comforting snack.
- They make a unique addition to any cookie platter, sure to spark conversation.
- Pack them in lunchboxes for a homemade treat that’s a little different.
Storage and Reheating
- Storing Baked Cookies: Store cooled potato peanut butter cookies in an airtight container at room temperature for up to 3-4 days.
- Freezing Baked Cookies: Baked cookies can be frozen for up to 2-3 months. Place them in a single layer on a baking sheet to freeze solid, then transfer to a freezer-safe bag or container. Thaw at room temperature before serving.
- Freezing Dough Logs: You can also freeze the unsliced dough logs. Wrap them tightly in plastic wrap and then in foil. Freeze for up to 1 month. When ready to bake, thaw slightly in the refrigerator until firm enough to slice, then proceed with baking instructions.
Frequently Asked Questions
Can I use instant mashed potatoes?
For the best texture and flavor, fresh mashed potato is highly recommended. Instant mashed potatoes tend to have a different consistency and can sometimes make the dough gummy.
Why are my cookies spreading too much?
This could be due to several factors: your butter might have been too soft, the dough wasn’t chilled enough, or your oven temperature might be too low. Ensure your dough is well-chilled and your oven is accurately preheated.
Can I make these cookies ahead of time?
Absolutely! The dough logs can be prepared and chilled for up to 2-3 days in the refrigerator before slicing and baking. This makes them perfect for meal prep or entertaining.
Final Recipe Notes
These Potato Peanut Butter Cookies are more than just a dessert; they’re a delicious journey back in time, showcasing how simple ingredients can create extraordinary flavors. Don’t let the unconventional ingredient list deter you – the mashed potato simply lends an incredible tenderness to the cookie, making it melt-in-your-mouth delicious. Give this vintage recipe a try, and you might just discover your new favorite cookie!
Ingredients
- 1 large russet potato (about 1.5 cups mashed)
- 1/2 cup unsalted butter, softened
- 1 cup granulated sugar
- 1 large egg
- 1 teaspoon vanilla extract
- 2 1/2 cups all-purpose flour
- 1 teaspoon baking powder
- 1/2 teaspoon salt
- 1 cup creamy peanut butter
- 1/2 cup powdered sugar (confectioners’ sugar)
- 2 tablespoons unsalted butter, softened
- 1-2 tablespoons milk (as needed for consistency)
Instructions
- Prepare the Potato: Peel and cut the potato into chunks. Boil until very tender, then drain thoroughly. Mash until completely smooth, ensuring no lumps remain. Let it cool completely. You’ll need about 1.5 cups of mashed potato.
- Cream Wet Ingredients: In a large mixing bowl, cream together the softened butter and granulated sugar until light and fluffy. Beat in the egg and vanilla extract until well combined.
- Add Potato: Stir the cooled mashed potato into the wet ingredients until fully incorporated.
- Combine Dry Ingredients: In a separate bowl, whisk together the all-purpose flour, baking powder, and salt.
- Form the Dough: Gradually add the dry ingredients to the wet ingredients, mixing until a soft, pliable dough forms. Do not overmix. Cover the dough and chill for at least 30 minutes to make it easier to handle.
- Prepare the Filling: While the dough chills, combine the creamy peanut butter, powdered sugar, and softened butter in a medium bowl. Mix until smooth. Add milk one tablespoon at a time until the mixture is spreadable but not too runny.
- Roll Out the Dough: Divide the chilled cookie dough in half. On a lightly floured surface (or dusted with powdered sugar, as shown), roll out one half of the dough into a rectangle, approximately 1/4 inch thick.
- Spread Filling: Evenly spread half of the peanut butter filling over the rolled-out dough, leaving a small border around the edges.
- Roll and Chill: Starting from one long side, carefully roll the dough into a tight log. Repeat with the second half of the dough and filling. Wrap each log tightly in plastic wrap and chill in the refrigerator for at least 1-2 hours, or until firm enough to slice easily.
- Preheat Oven & Slice: Preheat your oven to 375°F (190°C). Line baking sheets with parchment paper. Unwrap the chilled dough logs and slice them into 1/4-inch thick rounds.
- Bake Cookies: Place the cookie slices about 1 inch apart on the prepared baking sheets. Bake for 10-12 minutes, or until the edges are lightly golden.
- Cool and Serve: Let the cookies cool on the baking sheets for a few minutes before transferring them to a wire rack to cool completely.
- Prep time: 45 minutes
- Cook time: 10-12 minutes
- Total time: 2 hours 30 minutes
- Servings: 36 cookies