
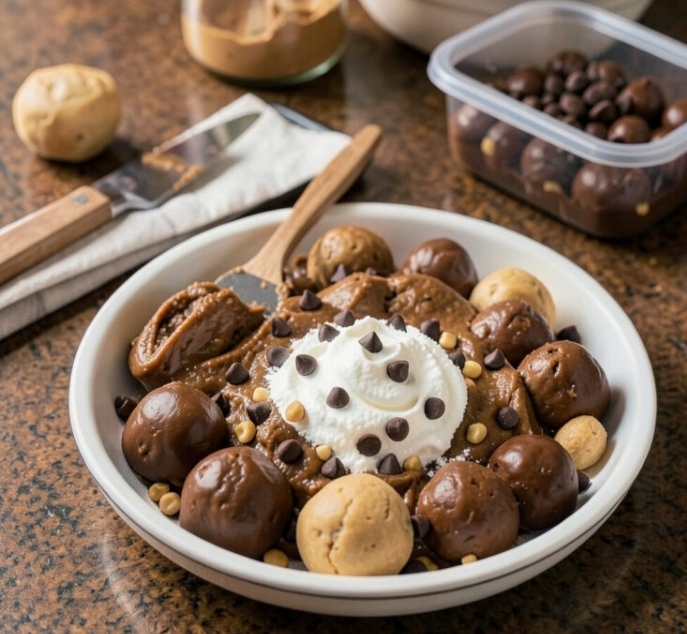
Why You’ll Love These Easy Chocolate Peanut Butter Balls
If you’re looking for a dessert that delivers maximum flavor with minimal effort, you’ve found it! These no-bake chocolate peanut butter balls are a true crowd-pleaser, known for their rich taste and incredibly simple preparation. They’re so popular that they become a holiday staple for many, with hundreds made each Christmas season. The combination of creamy peanut butter, sweet fluff, and rich chocolate creates an irresistible treat that disappears quickly from any dessert spread.
This recipe is perfect for beginner bakers or anyone short on time. There’s no oven required, making it a fantastic option for warmer months or when your oven is busy with other dishes. Plus, making these chocolate peanut butter balls is a fun activity for the whole family, especially when it comes to rolling the dough and dipping them in melted chocolate. Get ready to add this simple, great-tasting recipe to your go-to dessert collection!
Ingredients for Irresistible Peanut Butter Balls
The beauty of these chocolate peanut butter balls lies in their straightforward ingredients. You likely have most of these on hand already, making them a convenient choice for a spontaneous baking session.
- Peanut Butter: The star of the show! Creamy peanut butter works best for a smooth texture, but you can experiment with crunchy for added texture.
- Whipped Topping or Marshmallow Fluff: This is the secret ingredient that gives these balls their light, melt-in-your-mouth texture and helps bind everything together.
- Powdered Sugar: Essential for sweetness and to achieve the perfect dough consistency.
- Mini Chocolate Chips: These are mixed into the peanut butter dough for an extra burst of chocolatey goodness in every bite.
- Chocolate Melting Wafers or Chocolate Chips: For the decadent outer coating. Using melting wafers can make the dipping process smoother, but good quality chocolate chips also work wonderfully.
- Shortening or Coconut Oil (optional): A small amount can be added to the melting chocolate to create a smoother, glossier finish and make dipping easier.
Ingredient Notes for Best Results
Choosing the right ingredients can make a big difference in the final outcome of your chocolate peanut butter balls. For the peanut butter, stick to a classic creamy variety. Natural peanut butters tend to be oilier and can alter the consistency of the dough, making it harder to form the balls. If you do use natural peanut butter, you might need to adjust the amount of powdered sugar to reach the desired texture.
When it comes to the whipped topping, ensure it’s thawed if using a frozen variety. Marshmallow fluff is an excellent alternative that provides a similar texture and sweetness. For the chocolate coating, good quality melting wafers or chocolate chips will give you the best glossy finish and flavor. If using chocolate chips, adding a teaspoon of shortening or coconut oil while melting can help achieve a smoother consistency for easier dipping and a professional look.
How to Make Chocolate Peanut Butter Balls
Making these no-bake treats is incredibly simple, following just a few easy steps:
- Combine Wet Ingredients: In a large mixing bowl, combine the creamy peanut butter and the whipped topping or marshmallow fluff. Mix until thoroughly combined and smooth.
- Add Dry Ingredients: Gradually add the powdered sugar to the peanut butter mixture, mixing well after each addition until a thick, pliable dough forms. The dough should be firm enough to roll but still soft.
- Stir in Chocolate Chips: Fold in the mini chocolate chips until they are evenly distributed throughout the peanut butter dough.
- Roll the Balls: Take small portions of the dough and roll them into uniform, bite-sized balls. Place the rolled balls onto a parchment-lined baking sheet.
- Chill: Place the baking sheet with the peanut butter balls into the refrigerator for at least 30 minutes, or until they are firm. This step is crucial for preventing them from falling apart when dipped in chocolate.
- Melt Chocolate: While the balls are chilling, melt your chocolate melting wafers or chocolate chips. You can do this in a microwave-safe bowl in 30-second intervals, stirring between each, or using a double boiler method. If desired, stir in a teaspoon of shortening or coconut oil for a smoother consistency.
- Dip and Coat: Once the peanut butter balls are firm, carefully dip each one into the melted chocolate, ensuring it’s fully coated. Use a fork or a dipping tool to lift them out, allowing excess chocolate to drip off.
- Cool and Set: Return the chocolate-coated balls to the parchment-lined baking sheet. Let them cool at room temperature until the chocolate sets, or place them back in the refrigerator for faster setting.
- Serve and Enjoy: Once the chocolate is firm, your delicious no-bake chocolate peanut butter balls are ready to be enjoyed!
Helpful Tips for Perfect Peanut Butter Balls
- Chill Thoroughly: Don’t skip the chilling step! Cold peanut butter balls are much easier to dip and will hold their shape better in the warm chocolate.
- Use a Scoop: For uniform size, use a small cookie scoop to portion out the peanut butter dough before rolling.
- Smooth Chocolate: If your melted chocolate seems too thick, add a tiny bit of shortening or coconut oil (about 1 teaspoon per cup of chocolate chips) to thin it out. This will make dipping easier and give a smoother finish.
- Work in Batches: If making a large quantity, keep some of the peanut butter balls in the refrigerator while you dip others to ensure they stay firm.
- Parchment Paper is Key: Always line your baking sheets with parchment paper for easy removal and cleanup.
Ingredient Substitutions and Variations
This recipe is quite forgiving and open to variations:
- Peanut Butter Alternatives: While creamy peanut butter is recommended, you can try other nut butters like almond butter or cashew butter for a different flavor profile. Be aware that the consistency might vary, requiring adjustments to powdered sugar.
- Chocolate Coating: Experiment with different types of chocolate for the coating – dark chocolate, milk chocolate, or even white chocolate. You can also drizzle contrasting chocolate colors for a decorative touch.
- Add-ins: Mix in finely chopped nuts (like pecans or walnuts) into the peanut butter dough for extra crunch. A pinch of sea salt can also enhance the chocolate and peanut butter flavors.
- Flavor Boost: Add a teaspoon of vanilla extract to the peanut butter mixture for an extra layer of flavor.
Serving Suggestions
These chocolate peanut butter balls are perfect on their own as a sweet snack or dessert. They’re also fantastic for:
- Holiday Platters: Their festive look and delicious taste make them a staple on Christmas cookie trays.
- Potlucks and Parties: Easy to transport and universally loved, they’re always a hit at gatherings.
- Gift Giving: Package them in pretty tins or boxes for a thoughtful homemade gift.
- Coffee or Tea Time: A delightful accompaniment to your favorite hot beverage.
Storage and Reheating
These no-bake chocolate peanut butter balls store beautifully, making them ideal for meal prep or making ahead for events.
- Refrigeration: Store the finished balls in an airtight container in the refrigerator for up to 1-2 weeks.
- Freezing: For longer storage, arrange the chocolate peanut butter balls in a single layer on a parchment-lined baking sheet and freeze until solid. Once frozen, transfer them to a freezer-safe airtight container or bag. They can be stored in the freezer for up to 2-3 months. Thaw in the refrigerator or at room temperature before serving.
Frequently Asked Questions
Q: Why are my peanut butter balls too sticky?
A: This usually means you need to add more powdered sugar. Gradually add more, a tablespoon at a time, until the mixture is firm enough to roll without sticking excessively to your hands.
Q: Can I use natural peanut butter?
A: While you can, natural peanut butter tends to be oilier and less stable, which can make the dough harder to work with. If you use it, you might need more powdered sugar to get the right consistency.
Q: How do I get a smooth chocolate coating?
A: Ensure your chocolate is melted smoothly and fully, without any lumps. Adding a small amount of shortening or coconut oil (about 1 teaspoon per cup of chocolate) can help thin the chocolate and give it a glossy finish. Also, make sure your peanut butter balls are very cold before dipping.
Q: Can I make these ahead of time?
A: Absolutely! These treats are excellent for making ahead. They store well in the refrigerator for over a week and can be frozen for several months, making them perfect for holiday planning or batch baking.
Final Recipe Notes
These easy no-bake chocolate peanut butter balls are truly a joy to make and even more so to eat. Their simplicity, combined with their incredible flavor, makes them a standout dessert that everyone adores. Whether you’re making them for a special occasion or just to satisfy a sweet craving, this recipe is guaranteed to become a cherished favorite. Enjoy the process, and savor every delicious bite!
Ingredients
- 1 ½ cups creamy peanut butter
- 1 cup whipped topping (thawed) or marshmallow fluff
- 3-4 cups powdered sugar (confectioners’ sugar), plus more if needed
- ½ cup mini chocolate chips (for the filling)
- 16 oz chocolate melting wafers or good quality chocolate chips
- 1-2 tsp shortening or coconut oil (optional, for chocolate coating)
Instructions
- In a large mixing bowl, combine the creamy peanut butter and whipped topping (or marshmallow fluff). Mix until well combined and smooth.
- Gradually add the powdered sugar, one cup at a time, mixing thoroughly after each addition until a firm, pliable dough forms. The dough should be easy to roll but not sticky. If too sticky, add a bit more powdered sugar.
- Fold in the mini chocolate chips until evenly distributed throughout the peanut butter dough.
- Line a baking sheet with parchment paper. Take small portions of the dough (about 1 tablespoon each) and roll them into uniform bite-sized balls. Place them on the prepared baking sheet.
- Refrigerate the peanut butter balls for at least 30 minutes, or until they are firm. This will help them hold their shape during dipping.
- While the balls are chilling, prepare your chocolate coating. Melt the chocolate melting wafers or chocolate chips in a microwave-safe bowl in 30-second intervals, stirring well after each, until smooth. Alternatively, use a double boiler. If desired, stir in 1-2 teaspoons of shortening or coconut oil for a smoother, glossier coating.
- Remove the chilled peanut butter balls from the refrigerator. Using a fork or a dipping tool, dip each ball into the melted chocolate, ensuring it’s fully coated. Lift the ball and allow any excess chocolate to drip off.
- Return the chocolate-coated balls to the parchment-lined baking sheet. Let them cool at room temperature until the chocolate sets, or place them back in the refrigerator for faster setting.
- Once the chocolate is firm, transfer the chocolate peanut butter balls to an airtight container. Store in the refrigerator until ready to serve.
- Prep time: 30 minutes
- Cook time: 0 minutes
- Total time: 1 hour (including chilling)
- Servings: Approximately 40-50 balls